Create Your Own r_cycle Instrument
A step-by-step guide
Words: Peter Kirn
r_cycle is a free library that lets you build powerful tools for performance and production. In our primer on r_cycle, we got to know Pure Data (Pd), the open-source, cross-platform environment in which r_cycle was built, and got to understand what r_cycle was and how it might be used. And we got you started with Pd, even if you’ve never used it before. Be sure to read that introduction if you haven’t already. Now, with that done, we get to play.
The fun part of all of this is building your own stuff. The combination of Pd software with Novation Launchpad hardware means you can create your own original sound instrument that works the way you want — and lets you get your hands on it.
1. Grab The Latest Version of Pd and r_cycle
You can download the latest Pd (0.50 or later minimum) on Miller Puckette’s personal site. The up-to-date version of r_cycle will always be on GitHub.
2. Add r_cycle to your Project
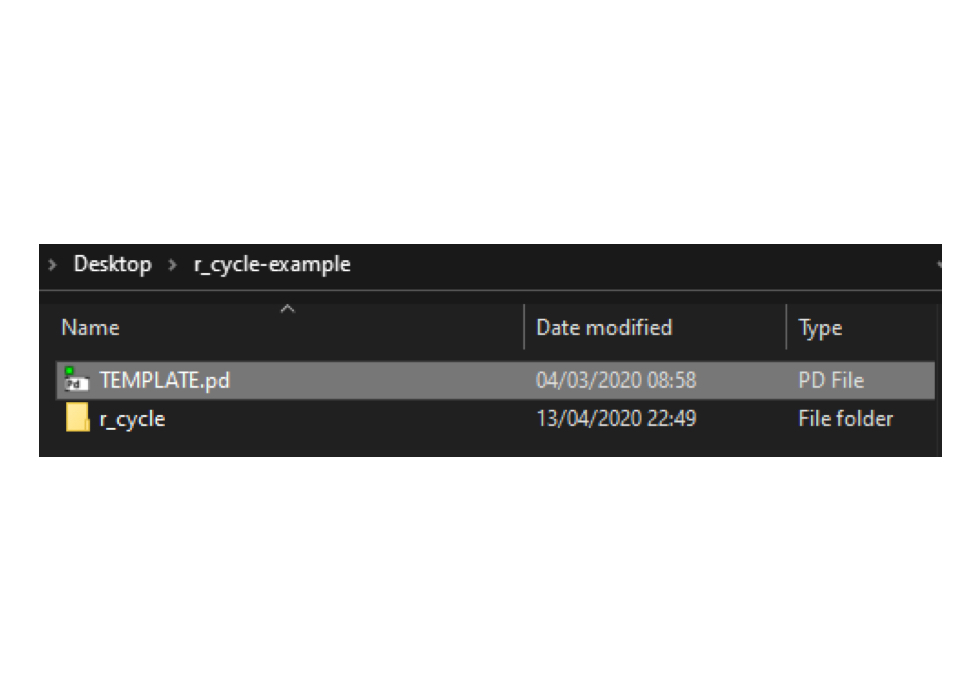
Next, create a new folder for housing your patch or patches. This way, you can create a self-contained project you can load onto other machines or send to friends. Copy the whole r_cycle folder to this folder. Next, duplicate the TEMPLATE.pd file and give it a new name — SAMPLESLICER.pd or whatever you’re building.
To keep a simple folder structure for distribution, you can add an object in the patch that looks for that whole subfolder: declare -path r_cycle
To jump start this process, we've created a sample project, which can be opened from the examples folder that you downloaded alongside r_cycle. This includes tools from another free library, RjLib. If you haven’t already downloaded r_cycle, you can download it here:
Download r_cycle
3. Start me up
One cool thing about working in the r_cycle environment is that the hardware will respond dynamically as you change the patch. But first we have to start up that connection. Make sure your Launchpad of choice is plugged in. (You may need to quit Pd, connect it, and restart Pd if it wasn’t connected when you booted.)
Compatible Launchpads are: Launchpad X, Launchpad MK2, Launchpad Mini MK3, Launchpad Pro and Launchpad Pro MK3. Here, we’ll use Launchpad X for the examples, you’ll make some minor changes to customise other Launchpads — ignoring velocity on mini, and referring to the correct device names and trigger buttons.
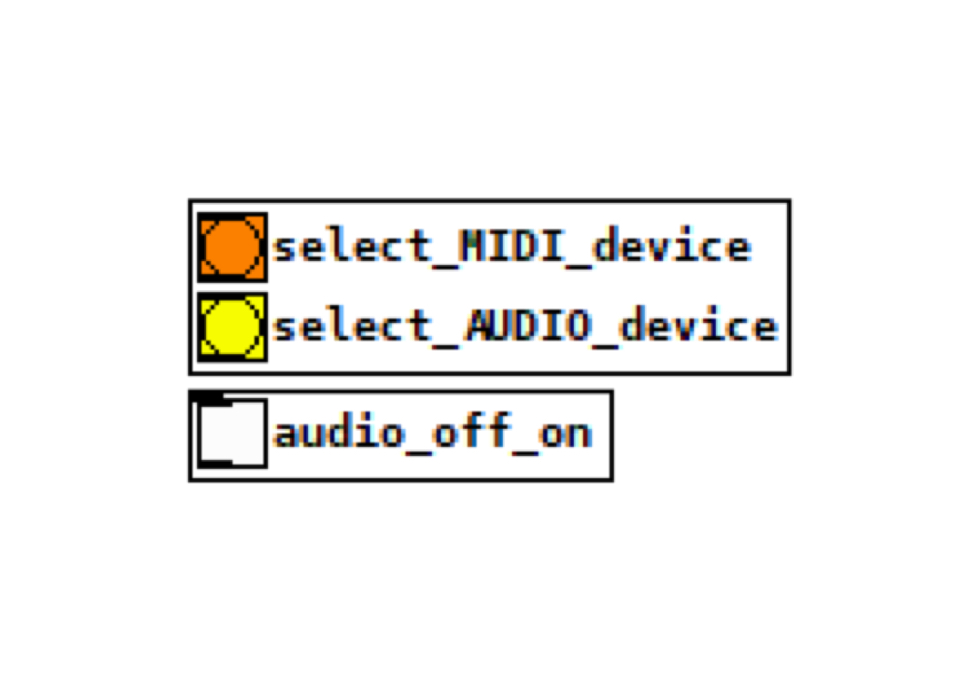
Check your MIDI and audio device settings are configured — there are even shortcuts right in the patch.
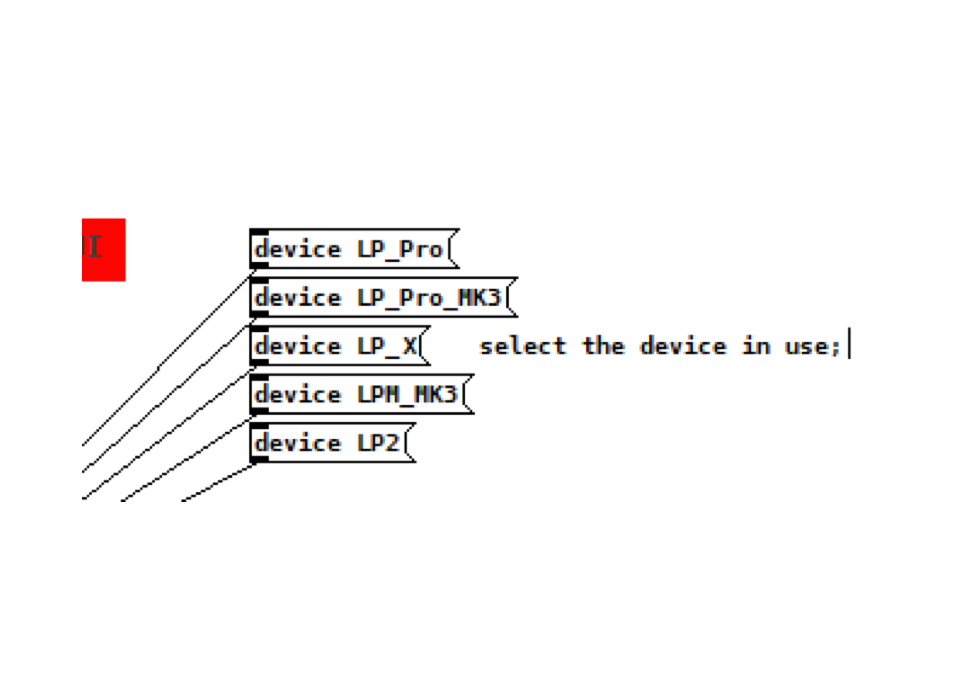
Next, follow the instructions. Turn on Edit mode ( Edit > Edit mode). Select your device, so in this case, I’ll click on device LP_X for my Launchpad X.
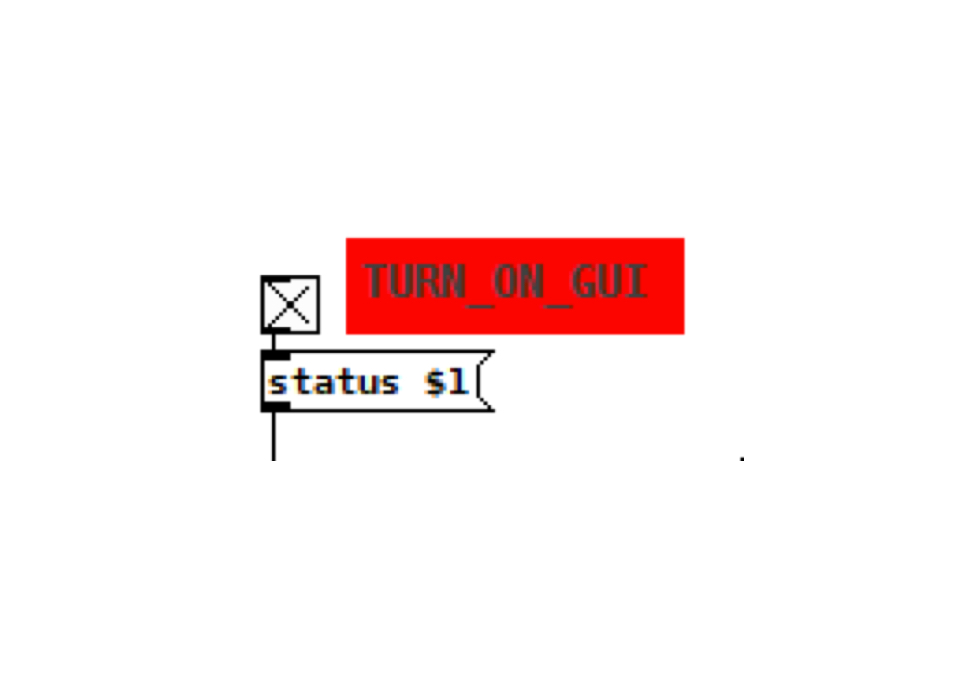
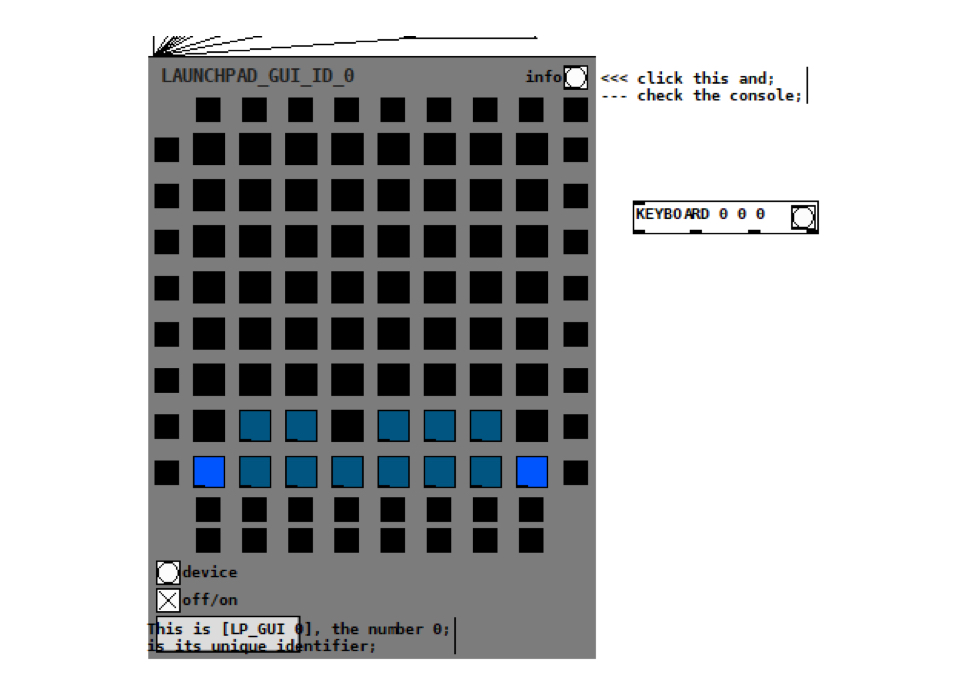
Turn on the GUI. This will synchronise what you see on the Launchpad with what’s in your Pd patch and in the preview in LAUNCHPAD_GUI. Initially, the Launchpad will darken.
Let’s light this up. Create a new KEYBOARD: choose Put > Object, and type in KEYBOARD 0 0 0. If everything is connected properly, you should see a blue melodic keyboard show up at the bottom of your Launchpad, and in the preview on-screen. (If that doesn’t happen, double-check your MIDI input and output settings, click the appropriate device again, and turn the GUI on and off. You need both the correct device selected in the patch and in Pd’s MIDI settings.)
Note: Different r_cycle patches can compete with one another if multiple patches have the same LP_GUI ID (which, by default, they do). It’s best to close all other patches and keep open just the patch you’re working on - or change the ID numbers if you want to work with more than one open at once.
What do the three zeros mean? We can find out. r_cycle is designed a lot like Web tools, in that you can ask what stuff does and have it respond. (Think like querying a Web API, if you’re a Web programmer.) So in this case, we can send a message to the KEYBOARD object to let us know what those numbers represent. Add a message object (Put > Message) and type print_args in it. Connect that message to the KEYBOARD object, and ctrl-(cmd-)click it (or enable Edit mode).
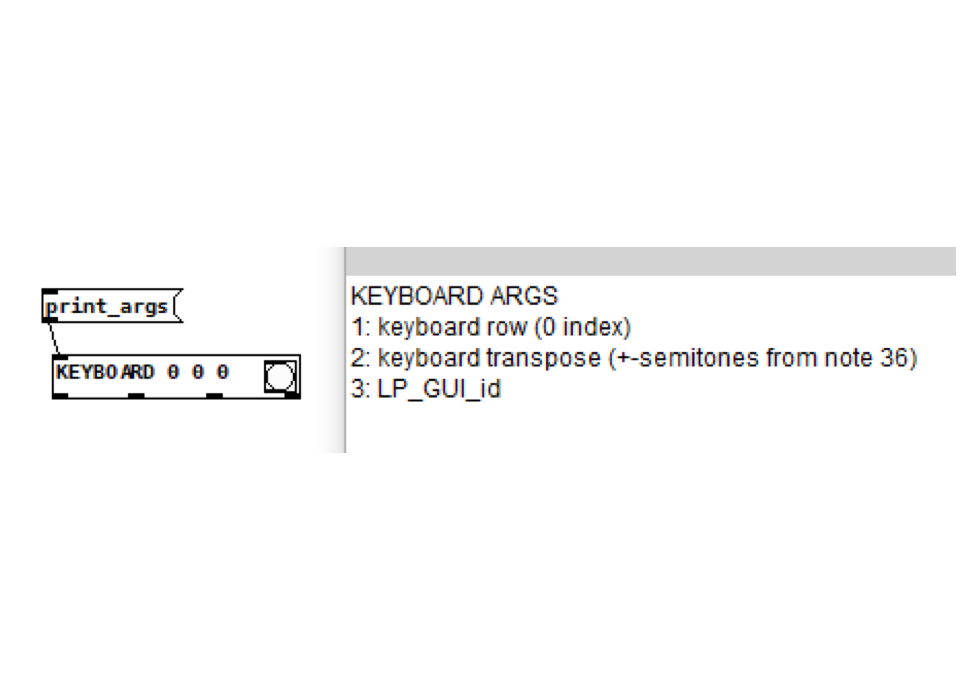
Now we can see that the first number specifies the row, the second number adds an optional transposition from MIDI note 36 (that’s C1), and the last digit is an LP_GUI_id — for this example, you’ll always want to choose ‘0’.
To help you stay oriented: Launchpad programming begins from the bottom left and reads right to left, bottom to top. (If that seems counterintuitive, just set your Launchpad upright and count the rows upward like height.) Also, programming interfaces start at 0, rather than 1, as their first digit. Let’s demonstrate that by moving the keyboard up a little bit. Edit the Object and change it to:
[ KEYBOARD 6 0 0 ]
Now it’s at the top instead of the bottom, leaving us some room for the rest of our patch.
In addition to arguments, we can find out what the mysterious black notches on the bottom do and query outlets. Click the bang — that’s the circle in a square on the right-hand side of the KEYBOARD object — and look at the Pd window. (Window > Pd Window, if it’s hidden.) There in the console you’ll see arguments, methods (like transposition or octave changes), and outlets. So we know that we can read pitch, velocity, aftertouch, and polytouch from that object, assuming you have a Launchpad that supports it. We’ll use this keyboard for pitch in a bit, but let’s move on and draw the rest of our interface.
4. Sketching a hardware UI
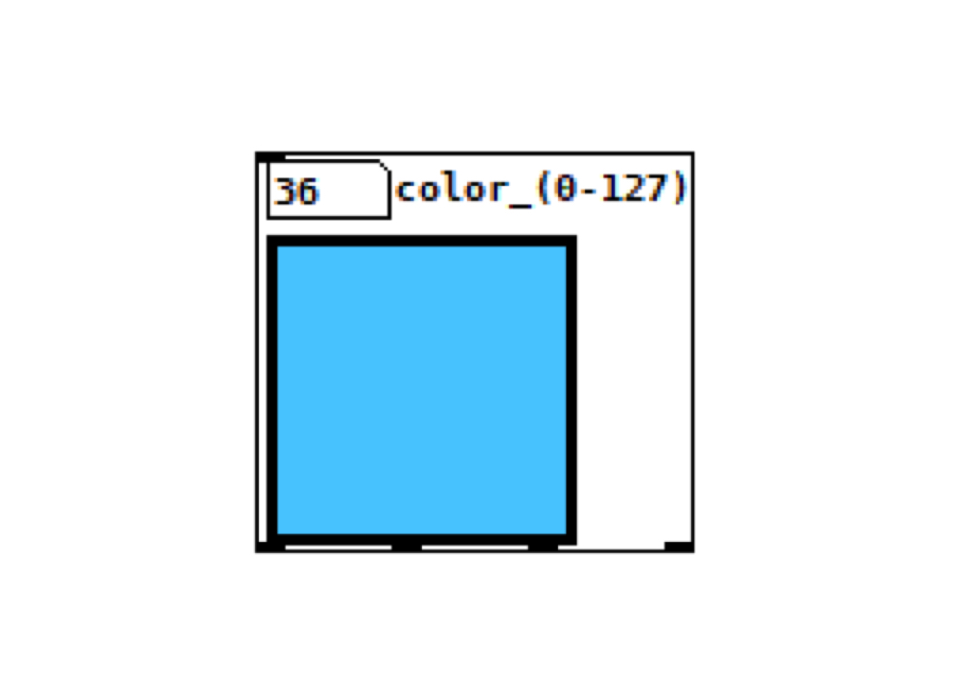
It’s your time to get personal. Colours are listed by hue from 127, so the easiest way to find colours you like is to create a picker. Type in [ COLORS ] and you get an object that gives you a preview and outputs the colour you need. (Just remember to try them on the LEDs because RGB LEDs will look a little different in person.)
There are different widgets available for hardware. If you need velocity and expression, choose KEYBOARD or DRUM_PADS. For interface elements or making on/off triggers, RADIO, BUTTON, GRID, and SLIDER will all work. (If you really want, there’s a custom SDK for making your own widgets, but this should get you started.)
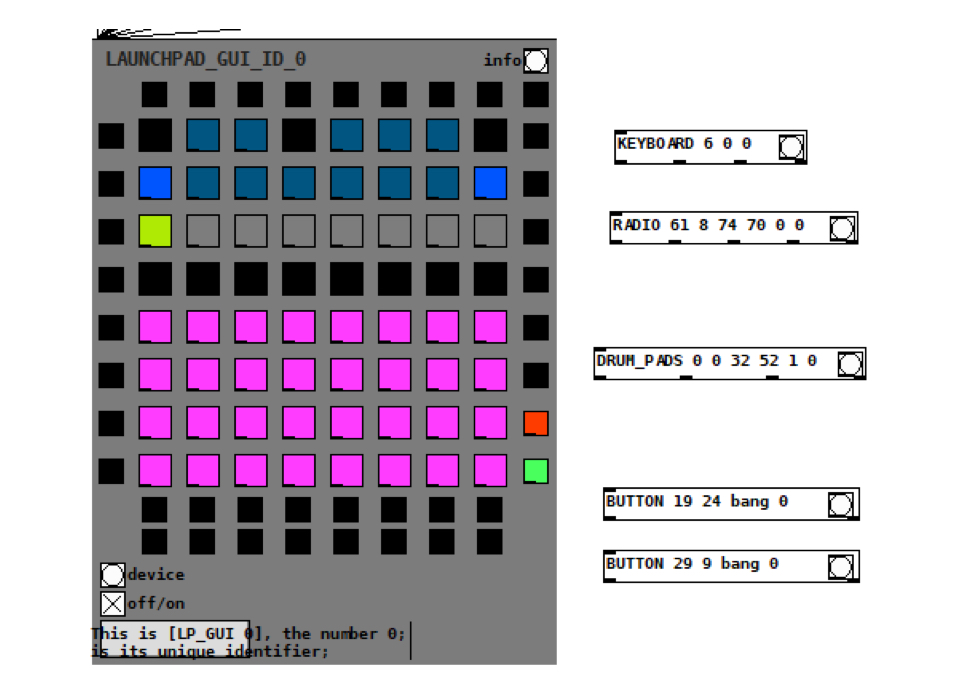
Let’s create a horizontal RADIO control, which later will be used to select sample playback speed:
[ RADIO 61 8 74 70 0 0 ]
That’s the origin pad, number of pads, colour (on), colour (off) , horizontal orientation, ID 0.
Lastly, we can make an 8x4 grid of drum pads.
[ DRUM_PADS 0 0 32 52 1 0 ]
This places the drum pad array at 0,0 (the bottom left-hand corner of the Launchpad), makes it 32 pads long, colour 52. The ‘1’ indicates that it’s a horizontal array; otherwise this object makes a square. (So a 4x4 grid for instance would be [DRUM_PADS 0 0 4 52 0 0 ]) The last digit is the GUI_ID.
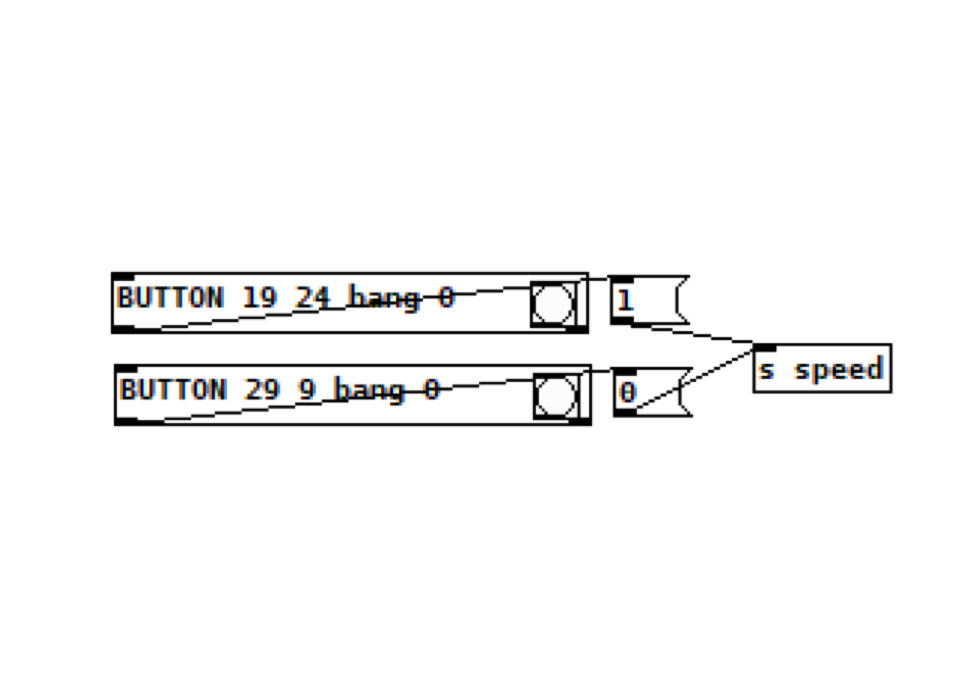
You’re not limited to the Launchpad’s 8x8 pads — the menu/interface buttons are all fair game, too. Without getting too crazy in this example, let’s make use of the Record Arm and Solo buttons on the bottom right for stop and play, respectively (the two buttons on the lower right):
[ BUTTON 29 9 bang 0 ]
[ BUTTON 19 24 bang 0 ]
Now we have our layout. Feel free to mess around with the colours if you don’t like these.
5. Wire the interface to sound
r_cycle includes its own useful pattern, sound-generation, and effects-processing tools, and you can mix and match it with other Pd patches. Here, we’ve pre-loaded a custom sample playback tool — one that allows not just triggering one-shots, but freely changing speed, direction, and position.
You’ll see declare -path lib at the top. This includes this custom patch as well as free and open source contributions from RjLib, another open Pd library. These will be located automatically when you type in their names, just as if they were internal Pd objects.
To add the sample playback engine, create an Object and enter:
[ flexsample ]
Connect its left and right outlets to a dac~ left and right inputs (it’s a stereo object) and enable DSP / audio.
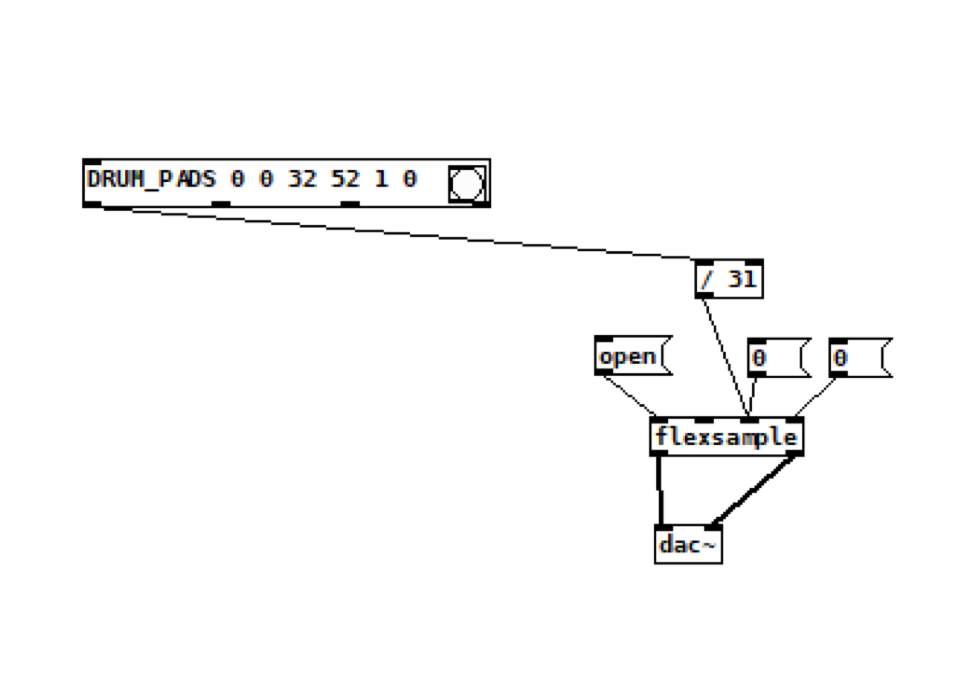
Let’s test it before we connect it to the Launchpad. Connect an ‘open’ message to the first inlet, [0] to the third inlet, and [1] to the fourth inlet. When you click ‘open’, you’ll be presented with a file dialog — most audio formats will work. (If the file is long, Pd will truncate it.) Click the other messages, proceeding from left to right, and assuming your interface is configured properly, playback will start.
For fun, change the [1] to a [-1] and you get reverse.
You can leave the interface like this and manually choose a sample when you load, or connect a message with a filename to the second inlet if you want to keep a sample handy.
But this gets more interesting once we input something from the Launchpad. Connect the first outlet (pad ID) from the DRUM_PADS object to a [ / 31 ] object (1 less than the 32 pads), and then to the third inlet on [flexsample], which represents position. Now as you play pads on that 8x4 grid, you’ll trigger different positions in the sample.
It has some double-triggering you may not want; next, we’ll adjust the control - sound mechanism.
6. Processing control from Launchpad
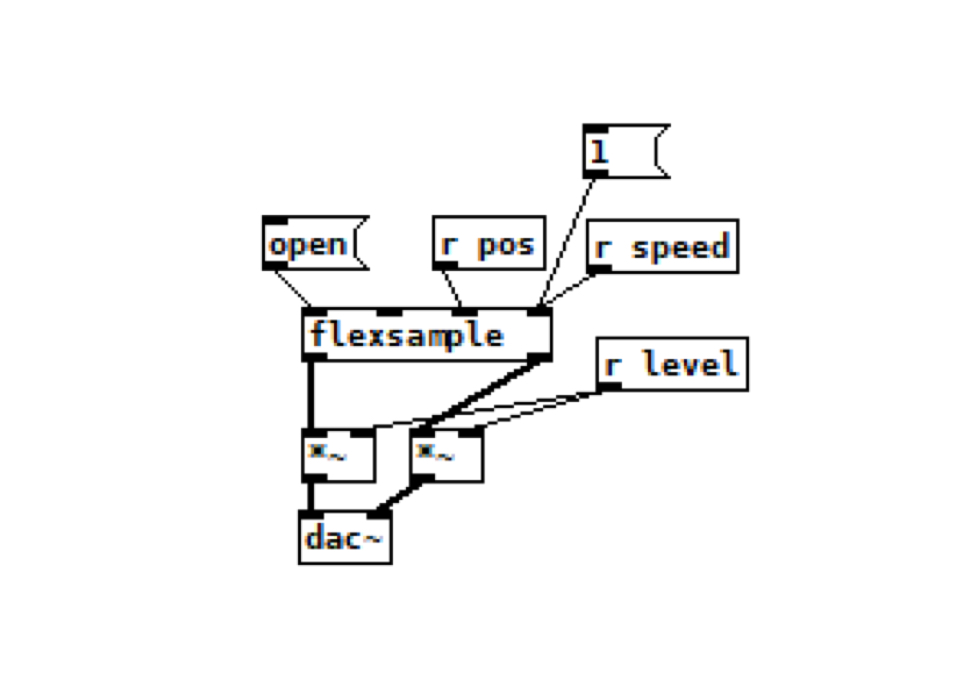
Move flexsample to its own space on the canvas, and add two new objects: [ r pos ] and [ r speed ] in the third and fourth inlets, respectively. This will allow you to send to these parameters from anywhere in the patch. (r is short for receive)
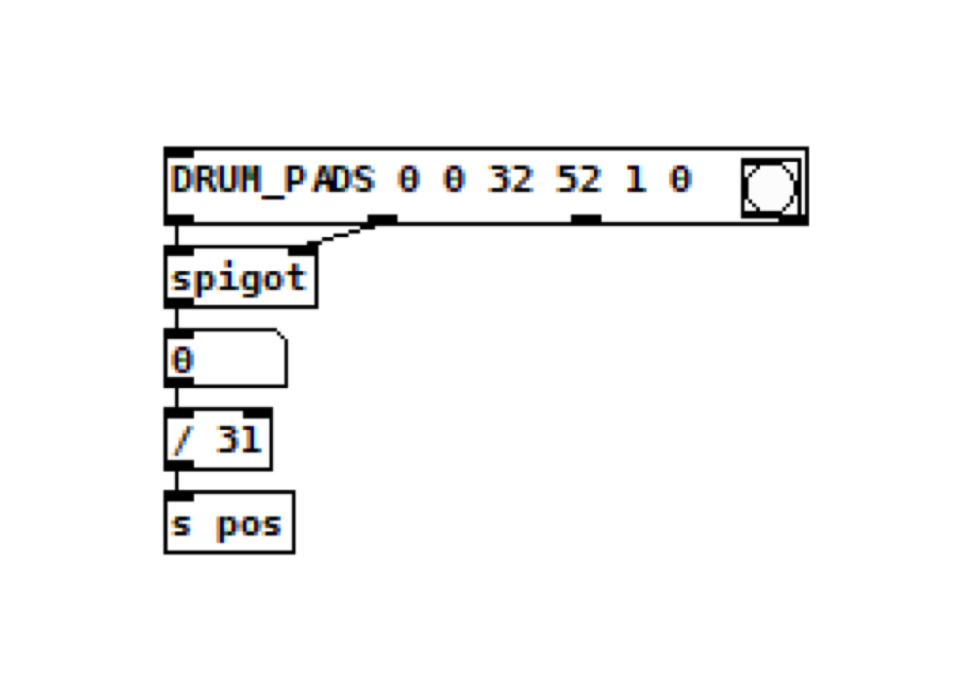
DRUM_PADS sends the pad ID both when you press and when you release a pad. Velocity is 0 when you release the pad. So to filter out just the times you press, choose the spigot object — it will only pass the number if velocity is nonzero.
Just connect the outlet with the pad ID to the left of spigot, and the velocity to the right (the right-hand inlet is what’s switching the spigot on and off). Position will go from left to right, bottom to top, so the beginning of our sample will be at the lower left, and end of the sample at the upper right. Connected, the DRUM_PADS object looks like this:
You may not want velocity, but if you do, you can add it by modulating the amplitude of the audio signal. Add *~ objects before the DAC first, with the right inlets connected to an [r level] object.
Then select nonzero velocities using the moses object (which splits the datastream — get it?).

Connect velocity outlets from the two DRUM_PADS to the left inlet of moses, and nonzero values will come out of the right outlet — where you can translate the 0-127 MIDI range to 0-1 for the amplitude, and then send to level. (You can set the value to 1 for any nonzero velocity, or higher if you don’t like accidentally hitting pads with a light touch.)
We can use the RADIO — the row near the top — to set playback speed.
We’ve chosen a set of speeds relative to normal formal playback (1x) and put them in a subpatch to get them out of the way. Create an object called [pd choosespeed], and a window opens in which you can add this small patch. The idea is to first load presets into a list, then choose the ID of the radio to select the desired element from that list.
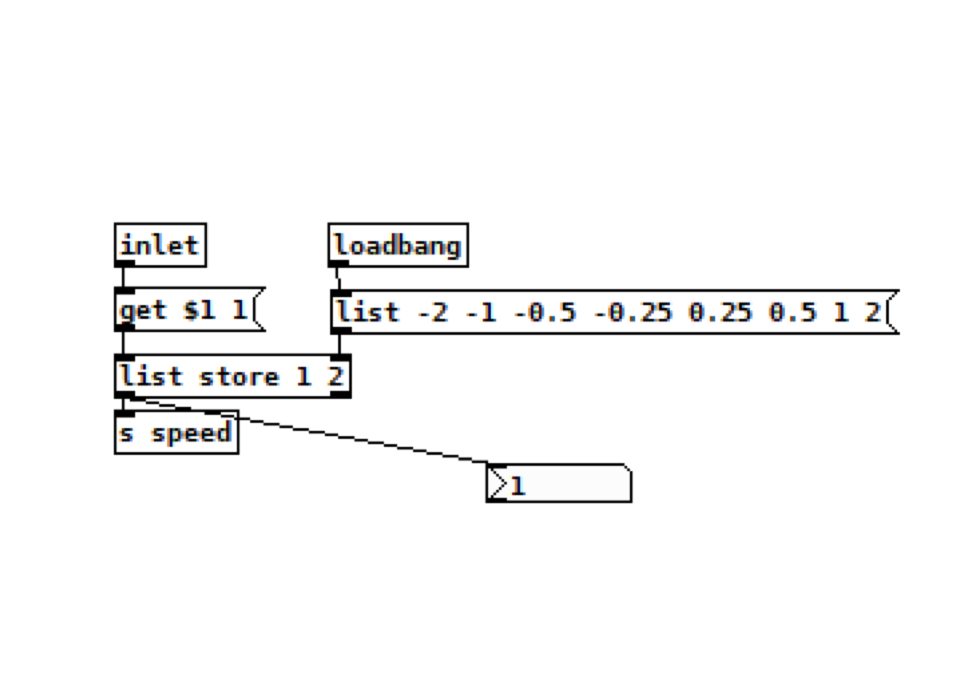
Note the loadbang — it’s necessary to pre-load the list into the object, or this won’t work. You could do this by hand with a patch — just click each message or bang object you want sent to initialise the patch — but loadbang does that for you.
We can also use that to set a default for the radio. The radio message responds to select messages, so we’ll tell it to select 6 (that’s one from the far right, where we’ve located playback speed = 1). We want this default to get loaded after the GUI has been initialised, so instead of a loadbang (which triggers a bang when you open the patch), we’ll use a receive object to set the default after the GUI has been initialised.
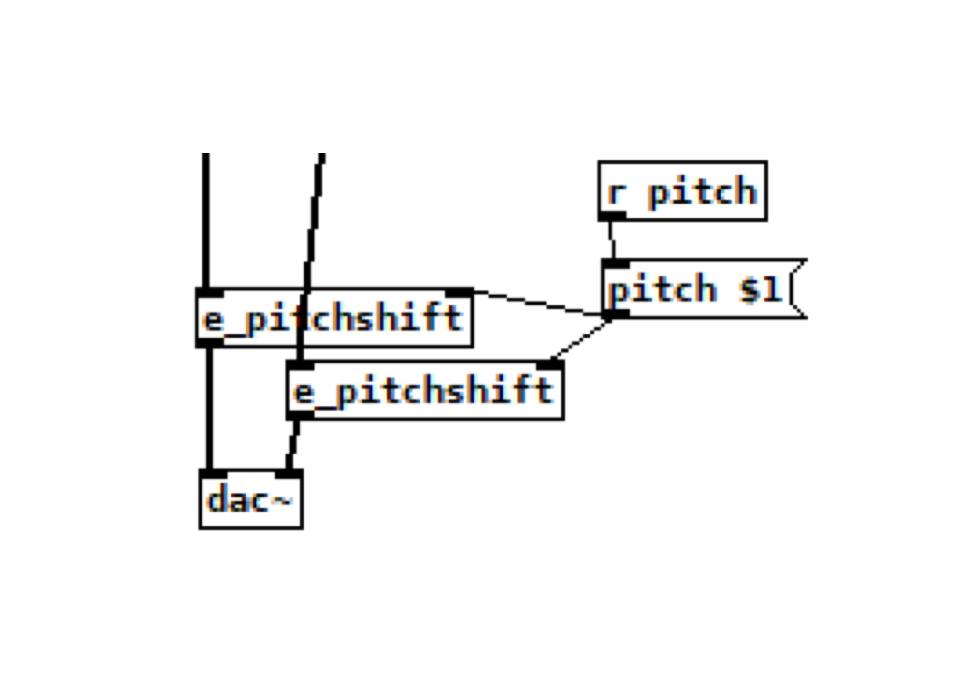
One last trick: we’ll use the keyboard to re-pitch the audio signal, using one of RJLib’s clever objects. Add e_pitchshift to each signal before the dac~, and send the value of the keyboard to change pitch.
Send the note value (subtract the number 36 as an offset).
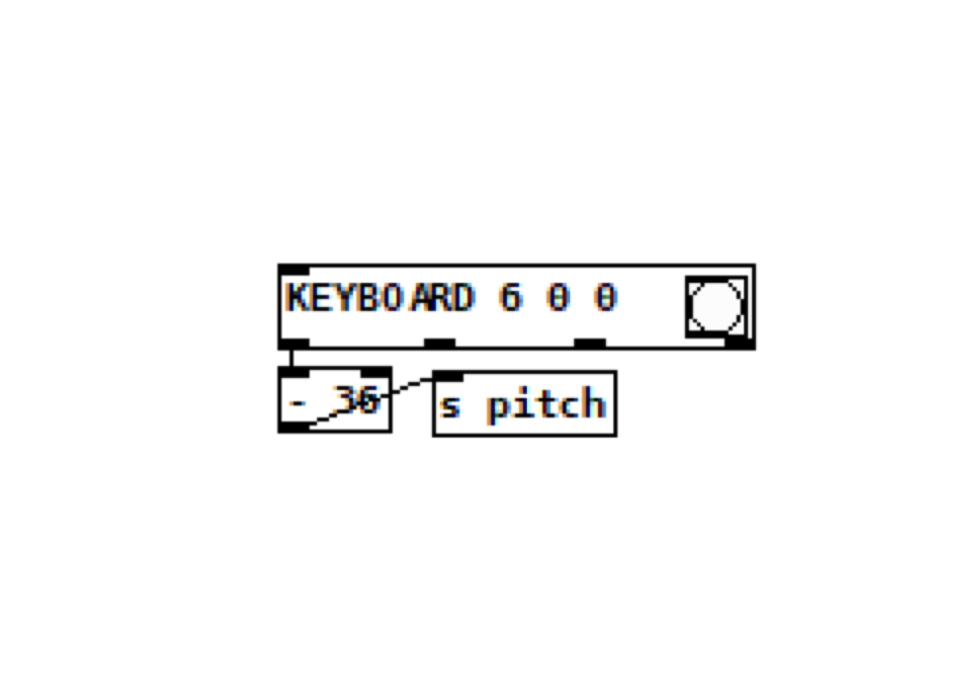
And then use that to transpose the pitch.
Lastly, wire up the buttons for play (green, on the bottom right) and stop (orange, one space above that). Now play returns you to a default play speed of 1, which is useful when you load the patch, especially, and you can start and stop playback quickly.
The fun of Pd is, you can keep going, basically until you run out of processing power and memory, or (more likely) you make the patch too complicated and busy!
So for instance, you might decide you want to add a tape delay. There’s a “free” one included in r_cycle. Just type TAPE_DELAY in and add it to the left and right channels, then adjust delay time, feedback, and wet/dry balance.
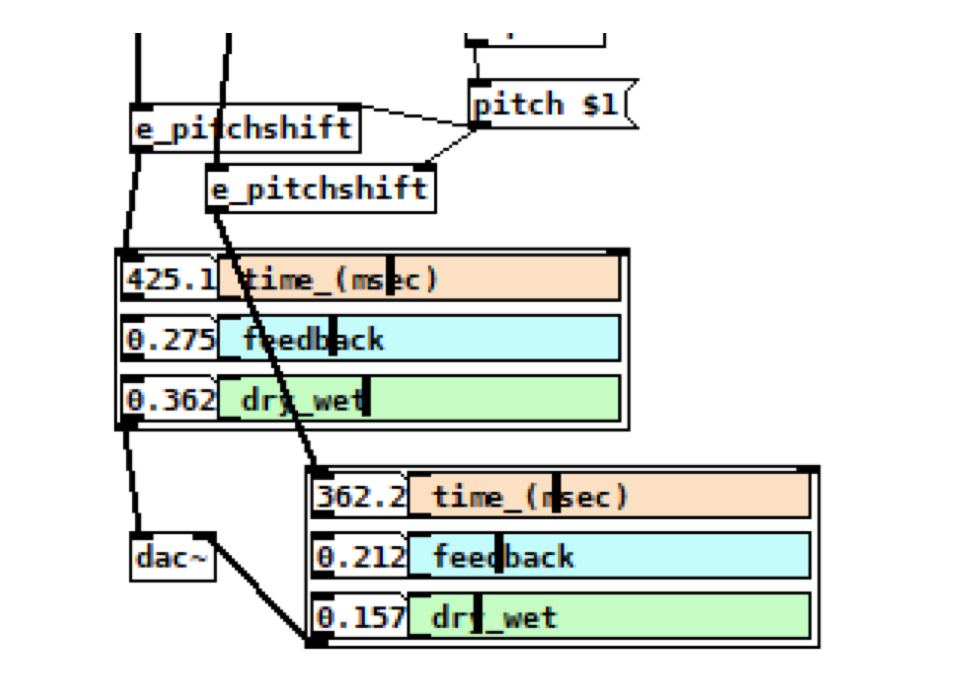
There are more effects to explore in r_cycle as well as in RjLib.
Now you get the idea. You could modify this patch to work in new ways, add features with the other trigger buttons, play with different effects and parameter settings, and more.
One more elaborate challenge might be to try adding Ableton Link sync, and then using that sync data for triggers. You could also consider replacing the DRUM_PADS with PATTERN and GRID objects, if you want to slice using a step sequencer rather than finger drumming by hand.
Try out the finished patch! It’s loads of fun on pretty much any kind of material — especially with extreme and reversed speeds for unique sounds, or once you practice different speeds.
Where to go next
You may have gotten enough from this to already begin building your own custom patches. But for a clearer sense of how r_cycle works, there are included examples in the distribution. Just remember to close each patch before opening another, or both patches will try to access your Launchpad’s GUI at the same time.
Start in the tutorials folder. These start with the first steps explaining the way r_cycle works. The tutorials will then walk you through making a simple synth, and show you how step sequencing works.
In examples, you’ll find more specific patches demonstrating specific features, like buttons, drum pads, Euclidean rhythms, and more.
Don’t forget, you can always learn more in the interface, by clicking the bang on the right-hand side of any r_cycle element — the Pd window will show the function of inlets, outlets, arguments, and methods. That’ll answer most questions. Right-click and choose open, and you can poke inside the innards of each r_cycle abstraction. (Advanced users only — or the chronically curious!)
And feel free to share your patches when they’re done — by documenting your performance or, once you’re not shy about the patches, by uploading your creations to GitHub or another location.
Happy patching!